| FAQ |
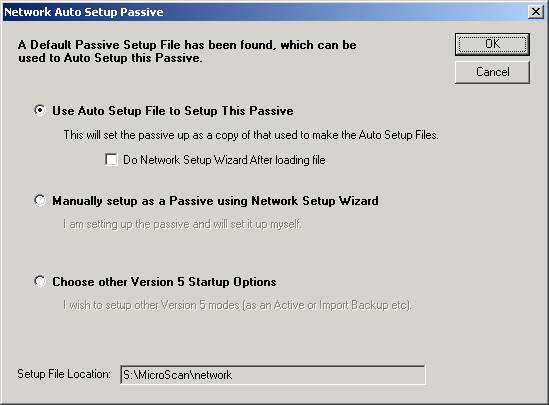
| Network Auto Setup Passive |
Auto Setup Passive can be used to duplicate or quickly rebuild the settings of passive microscans.
NOTE:
ALL passives need access to the same network drives, mapped to the same drive locations.
Summary:
When a passive is setup, it creates copies of its setup files "passive network.net", "passive page.net". When MicroScan V5 starts for the first time on a computer, it will look for these files in any attached network drives in the folder MicroScan\Network, then if found a new startup dialog is shown that will allow the passive to pick up and use its settings from these files or allow other startup options.
To auto setup a passive:
Click Use Auto Setup File to Setup This Passive, click OK.
The passive will be setup automatically, no other steps are needed.
OR Select "Manually Setup as a Passive", click OK
The passive can be setup in the normal way using the Network Setup Wizard
OR select "Choose other Version 5 Startup Options"
The normal Version 5 first run dialog is displayed.
Steps to setup passives in this way:
1. Set the active to store data on the server
2. Set the first passive to be setup the way you want (the other passives will be an exact copy).
3. Create a folder on one of the network drives "MicroScan\Network".
4. Copy the passive setup files (passive network.net and passive page.net) from the first passive (installfolder\Network Passive\setup) to a the Network MicroScan\Network folder.
5. Install Version 5 on the new passives and Start MicroScan. The dialog box above will be shown, click Ok and the passive will set itself up.
The transfer of settings from first passive to other passives is a once only step, once done the Network Setup can be used to change settings of passives as normal without being reset to the settings of the first passive.