| Recorder Quick Setup |
| Add a New Line |
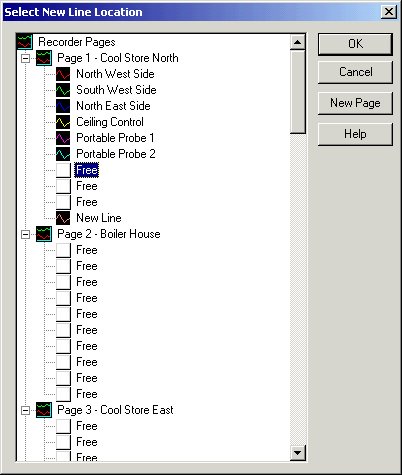
Step 1: Select line location.
Select a Free line to house the new line. A line can only be added on a Free
line location.
When this window is displayed the first free line will be highlighted, ready as
a selection for the new line.
Click OK.
The free lines are added consecutively. For example in the image above, there
are free lines in pages 1,2,3.
When we first add a line, the first free line is in Page 1. If we select to add
a line in Page 3, the next time we add a line, the next free line in Page 3 will
be selected. If no pages have any free lines, then a new page will be
automatically added.
If you want to create the line in a new page, click New Page

Enter a label for the Page and click OK.
A New Page will be created, and the first free line in the page will be
selected.
Step 2: Enter the line details.
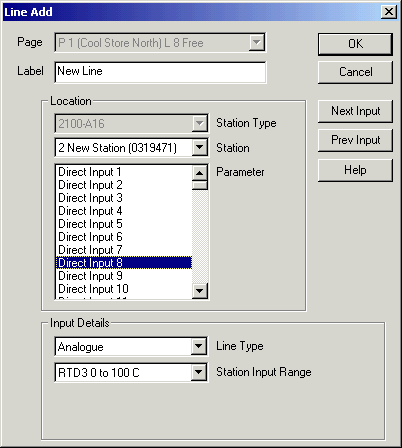
Enter the label for the line.
Select a station, then select the station parameters.
If the Line Add dialog has been shown before, you can click the Next Input
button to move to the next input on the station, or the Prev Input button to
move to the previous input on the station (If this is the first line added,
these buttons will be hidden).
The Input Details are selected according to the type of line.
If the line is connecting to input 1 to 16 on a 2100-A16 , you may enter a range
for the input under "Station Input Range".
When the Quick Setup is closed, this new range will be programmed to the input
on the station.
If the Scaling button is shown, the input needs to be scaled in the MicroScan
software, click the Scaling button to enter the scaling details.
Click OK to create the line.
The Line Add sequence is designed to make the steps for creating consecutive lines on a station easy, by following these steps.
1. Click Add.
2. Select a free line and click OK.
3. Select the lines location in the station.
4. Enter a label.
5. Click OK.
Then Repeat for all other lines.
1. Click Add.
2. Click OK or Select a free line and click OK.
3. Click Next Input.
4. Enter a label.
5. Click OK.