| Setup MicroScan |
| MicroScan Demo Install |
The software is installed and when first run, the demo job settings are loaded and the demo job becomes the current job. MicroScan V5 is then ready to use in demo mode.
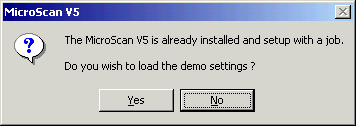
If the demo software is install on an existing Version 5 job, a Message Box will be displayed on startup asking to keep existing job or switch to demo job.

Click Yes to continue and load demo job, making this the current job.
Click No to ignore the demo job, and keep the existing job settings.
After the demo has been loaded (by clicking Yes or No above) the demo settings
wont be asked for again.
Switch Demo Install to Standard Install
The demo software is a standard install with a setting that makes it start in
demo mode, but after that it can be used as if it was standard install software.
To switch the demo software to End User or Agent mode, Use the Select Module
Wizard on the Setup Tools screen, and select End User, or Agent mode on the Select
Module Install screen.
Once the demo job has been loaded, you can switch to a previous job using
Select Job on the Setup Tools screen, or use Create Job on the Setup Tools
screen to create a new job.
Start First Run Sequence Again
To start the first run sequence again, delete the file microscan.ini from the c:\installdir folder.