| Help Topics |
| Demo Setup Omron FINS |
The MicroScan Driver can connect to ETN21. Connection via TCP (sockets) is preferred. See other Note Omron ETN21 Setup to see how to setup the ETN21 unit using the Omron CX Programmer software.
MicroScan supports FINS via Ethernet. It does not support
FINS via Serial Host link connection.
A MicroScan can connect to the ETN21 at the same time as CX Programmer. Up to
sixteen simultaneous connections are supported by one ENT21.
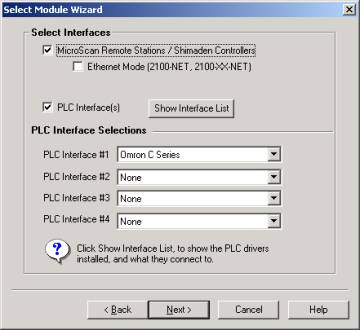
Step 1
On Setup Tools, Use the Select Module Wizard, and select the “Omron C Series” PLC interface as being installed.
Step 2
On the Setup Tools Screen, click the PLC Interfaces link to setup the IP table for the Interface.
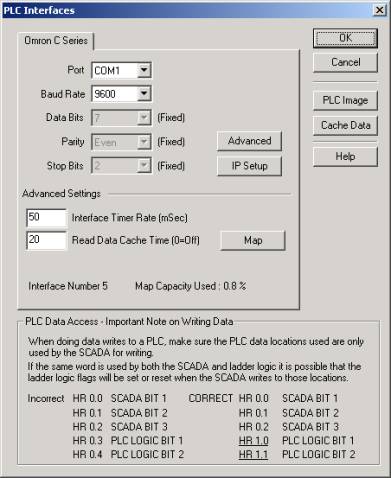
If the Interface is used only for ETN21 comms, set the Port
to None.
Click the IP Setup button to set addresses.
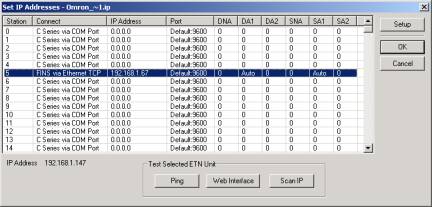
The IP address shown is the IP address of this computer.
To test an ETN21, select it and click Ping.
To view Web Interface for ETN21, select and click Web
Interface. Default ETN21 password is ETHERNET.
To scan the IP ETN21 subnet, select an ETN21 and click Scan
IP.
Select the Node required (this does not apply to a Node number in the plc or the node number set by the switches on the front of the ETN21), and click the Setup button.
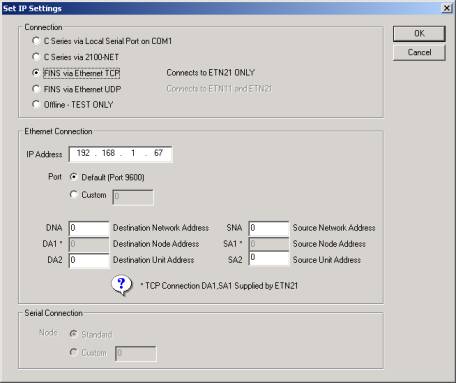
Set the connection to FINS via Ethernet TCP.
Set the IP address of the ETN21 and leave Port at default.
Set DNA, DA2, SNA, SA2 as required. For a direct Computer to ETN21 connection these can all be set to zero. The Microscan has only been tested directly to a ETN21 and CJ1G, and not linked to other PLCs. DA1 and SA1 are supplied by the ETN21 when MicroScan starts a socket connection to it.
Click OK.
Step 3a
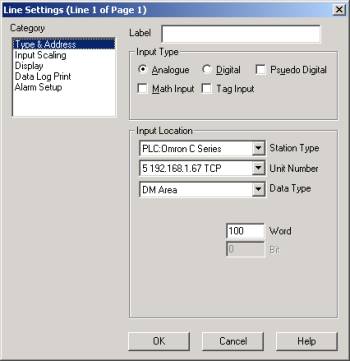
Set the Station Type to Omron C Series.
Set the unit number to that set in the IP setup dialog
above.
Set the Data Type and Word and Bit as required.
Step 3b
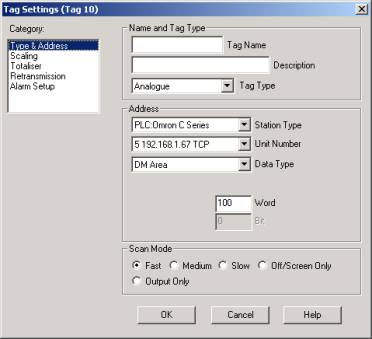
Set the Station Type to Omron C Series.
Set the unit number to that set in the IP setup dialog
above.
Set the Data Type and Word and Bit as required.
Step 4
The MicroScan driver window will show the status of the PLC connections and can save Ethernet messages TX and RX to standard microscan file rx.txt.
To View MicroScan Driver
Double click Station Status window (at bottom of Navigation
Tree)
![]()
On the View menu, Click Omron Interface
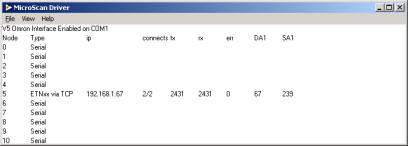
Connection info is shown, with tx and rx message count, DA1
and SA1 numbers supplied by ETN21.
If an err number is shown, it is a windows error code from
the socket connection. Make a note of the number.
To Save ETN21 data to rx.txt, click View, Save RX Data. Data stored in this file will be included in Tools Backup from Setup Tools, Backup Job Settings.