| Recorder User Help |
| Alarm Relay Setup |

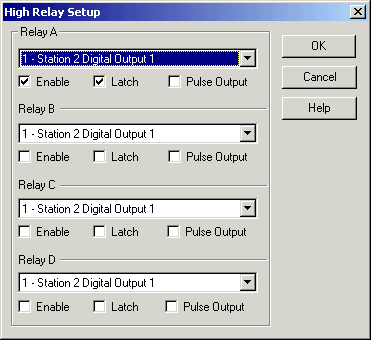
The dialog boxes title will change, “High Relay Setup” for the high relays and “Low Relay Setup” for the low relays.
For each alarm relay (Relay A, Relay B, Relay C, Relay D) select the relay number from the combo box and then set the latch/enable checkboxes accordingly.
Enable means the relay will be activated when the alarm occurs.
Latch means the alarm must be manually cleared. If Latch is not turned on, the Alarm is an unlatched alarm. An unlatched alarm does not appear in the Recorders Alarm Status window when the alarm occurs. This is because it is automatically cleared when the lines value returns to limits.
If Latch is turned on without Enable turned on, the Alarm is a display only Latched alarm, when the alarm occurs, it will appear in the Alarm Status dialog box but no output relays will be affected.
The Alarm Relay addresses must have been previously setup using Alarm Relay Setup in the Setup Manager or by adding a station in Recorder Quick Setup. If a relay has not been assigned an address, “No Address Assigned” will be shown in the relay list box.
Press “OK” to accept the new relay setup or “Cancel” to exit from the dialog box making no changes.