Items
ITEMS are the building blocks that TASKS use to accomplish a job.
This is the ITEM setup form:
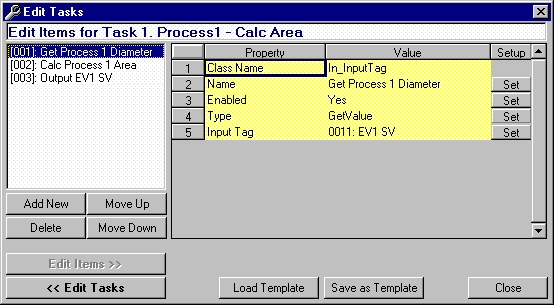
The ITEM Setup Form has the following parts:
- ITEM List on the left hand side. Click on an ITEM to view and edit its properties. Double clicking on an ITEM will return you to the TASK Setup Form.
- Property List on the right hand side. The Property List displays all of the properties which can be setup for a particular ITEM. To setup a property either double click on it or click on the respective "Set" button. A dialog box will appear which will allow you to either enter data or select an option.
- Add New Button. Click on this button to add a new ITEM.
- Delete Button. First select the ITEM to be deleted and then click on the Delete Button to delete the ITEM.
- Move Up Button. First select the ITEM to be moved up and then click on the Move Up Button to move the ITEM up one place in the list.
- Move Down Button. First select the ITEM to be moved down and then click on the Move Down Button to move the ITEM down one place in the list.
- Edit Items Button. This button is disabled in the ITEMS Setup Form.
- Edit Tasks Button. Click on the Edit Tasks Button to return to the TASKS Setup Form.
- Load Template Button. When in the ITEMS Setup Form, clicking on the Load Templates Button will allow you to append a template's ITEMS to the currently selected TASK. Once loaded the ITEMS may be edited to suit.
- Save as Template Button. This button allows you to save the currently selected TASK as a Template. Templates make it easy to duplicate TASKS.
 Back to Contents