Tasks
TASKS are used to group ITEMS together.
This is the TASK setup form:
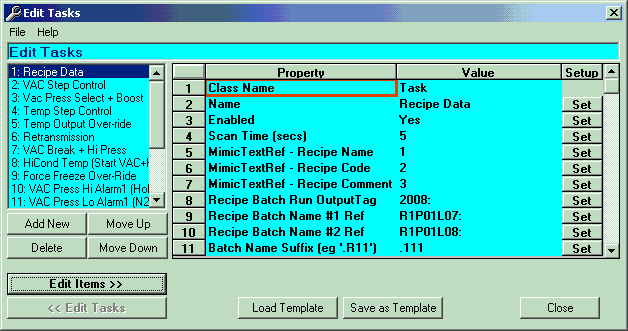
The TASK Setup Form has the following parts:
- TASK List on the left hand side. Click on a TASK to view and edit its properties. Double
clicking on a TASK will also take you to the ITEM Setup Form
where you will be able to setup the ITEMS for this TASK only.
- Property List on the right hand side. The Property List displays all of the properties
that can be setup for a particular TASK. To setup a property either double click on it or
click on the respective "Set" button. A dialog box will appear which will allow
you to either enter data or select an option.
- "Class Name" - This can not be changed and is displayed for information only.
- "Name" - Enter the name you wish to call the new Task.
- "Enabled" - To enable the Task set this property to 'Yes'.
- "Scan Time" - The Scan Time is the approximate time in seconds that the Task
will update.
- "MimicTxtRef - Recipe Name" - Used in conjunction with the Recipe facility in
the ToolBox Remote Editor program. If the ToolBox Remote Editor is used to select a Recipe
for this Task, then the Name of the Recipe will be written to the specified Mimic Text
Reference Number after the Recipe data has been loaded. If a Text object is set up on the
Mimic and set to get data from the same Mimic Text Reference Number then the Recipe Name
will be displayed on the Mimic.
- "MimicTxtRef - Recipe Code" - Used in conjunction with the Recipe facility in
the ToolBox Remote Editor program. If the ToolBox Remote Editor is used to select a Recipe
for this Task, then a Code for the Recipe can be entered and then written to the specified
Mimic Text Reference Number after the Recipe data has been loaded. If a Text object is set
up on the Mimic and set to get data from the same Mimic Text Reference Number then the
Recipe Code will be displayed on the Mimic.
- "MimicTxtRef - Recipe Comment" - Used in conjunction with the Recipe facility
in the ToolBox Remote Editor program. If the ToolBox Remote Editor is used to select a
Recipe for this Task, then a Comment for the Recipe can be entered and then written to the
specified Mimic Text Reference Number after the Recipe data has been loaded. If a Text
object is set up on the Mimic and set to get data from the same Mimic Text Reference
Number then the Recipe Comment will be displayed on the Mimic. Note that the Mimic Text
objects will only display the first 31 characters.
- "Recipe Batch Run Output Tag" - Used in conjunction with the Recipe facility
in the ToolBox Remote Editor program. If the ToolBox Remote Editor is used to select a
Recipe for this Task and an Output Tag has been selected then the ToolBox Remote Editor
will start the Batch after the Recipe data has been loaded.
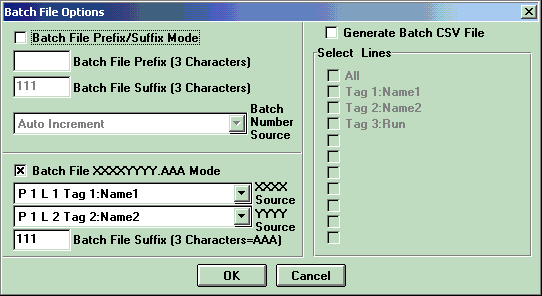
- "Recipe Batch Name #1 Ref" - Used in conjunction with the Recipe facility in
the ToolBox Remote Editor program. If the Remote Editor is used to select and start a
Recorder Batch then it can also specify the file name for the Batch store file. To do this
the Recorder Page must be set to Automatic Batch Recording Mode and the Auto Name Batch
File mode must be set to XXXXYYYY.AAA mode. When set like this then the recorder line
selected for this property must be the recorder line selected in the Batch setup to supply
the XXXX part of the file name.
-
- "Recipe Batch Name #2 Ref" - As per 9. above only the recorder line selected
for this property must be the recorder line selected in the Batch setup to supply the YYYY
part of the file name.
- "Batch Name Suffix (eg .111)" - Used in conjunction with 9. and 10. above.
This should be set to the same as the ".AAA" part of the Batch file name as
described in 9. above. Each Recorder Batch Page must have a unique suffix and the suffix
must begin with a period ".".
- "Use Recipes from Task?" - If recipes are to be used for this Task and if the
Task is identical to another one then the other Task's Recipes can be used by entering the
Task's number. This can be an advantage in having only one set of recipes for multiple
Tasks as opposed to having one set of recipes for each Task. For this property to work,
the Remote_Value Items must be in the same position in each Task.
MicroScan Setup Manager - Recorder Page Setup (Name & Scales) - refer to 9. above.
When setting up a Recorder Batch to work with the ToolBox Remote Editor take the
following steps -
1/ Set the Operating Mode to "Monitor & Batch Recording"
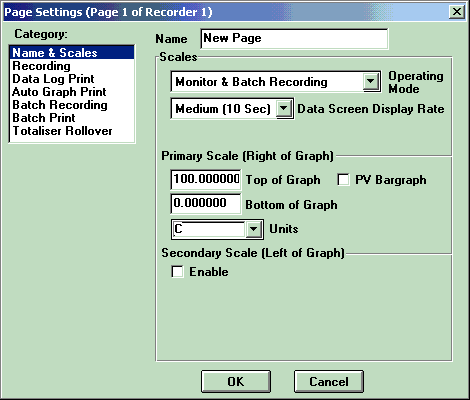
2/ Set the "Batch Recording Mode" to "Automatic", select the
"Link Page & Line" and check both the "No Batch Dialog Box" and
the "Auto Name Batch Files".

3/ Enable the "Batch File XXXXYYYY.AAA Mode" and select recorder lines for
both the "XXXX Source" and the "YYYY Source". Enter a "Batch File
Suffix" that is unique to this Recorder Batch Page only.
Notes
- When using the Batch Code, Batch File Name and Batch Comment fields with the MicroScan
Recorder Batch files, it is necessary to ensure that "Long Batch Header" option
in the Recorder Customisation dialog is NOT enabled.
Menus on the Task Setup form
- "File" menu has the following options:
- Export to File: Exports all of the TASKS to a text file using TAB delimiters.
- Import from File: Imports one TASK at a time from a TAB delimited text file as per the
Export function above.
- "Help" menu has the following options:
- Contents: Shows the help file contents page.
- Current: Shows the help for the current TASK or ITEM. (Also by pressing F1).
Buttons on the Task Setup Form
- Add New Button. Click on this button to add a new TASK.
- Delete Button. First select the TASK to be deleted and then click on the Delete Button
to delete that TASK.
- Move Up Button. First select the TASK to be moved up and then click on the Move Up
Button to move the TASK up one place in the list.
- Move Down Button. First select the TASK to be moved down and then click on the Move Down
Button to move the TASK down one place in the list.
- Edit Items Button. First select the TASK, then click on the Edit Items Button to go to
the ITEMS Setup Form where you will be able to edit the ITEMS for
the selected TASK only.
- Edit Tasks Button. This button is disabled in the TASKS Setup Form.
- Load Template Button. When in the TASKS Setup Form, clicking on the Load Templates
Button will allow you to add a Template as a new TASK to the
TASK List. Once loaded the TASK may be edited to suit.
- Save as Template Button. This button allows you to save the selected TASK as a Template. Templates make it easy to duplicate TASKS.
 Back to
Contents
Back to
Contents