| Mimic Setup |
| Gauge Object Setup |
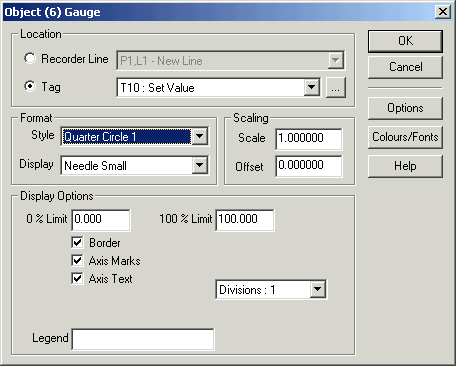
The Gauge object Setup is used to set properties for a gauge object
To access :
The following dialog appears:
This is a complete list, the actual options for each gauge are shown by which settings are available when editing the properties for the gauge, according to the style selected.
Location
The source line or tag, See Object Location.
Format
Style
Selects the type of gauge to be displayed.
Display
Selects the type of needle or pie option.
The needle can be thin, medium or thick. With the pie option, the background colour is used for the background of the object, and the foreground colour represents the amount of the input signal. Some objects do not have the pie option, it will reset to Needle Thin if selected.
Scaling
Scale
Allows the tags or line's value to be prescaled before use on the object. i.e if the tag is 0 to 9000 rpm, we could a scale factor of 0.001 to scale the value 0-9 and use 0 and 9 for the 0% and 100% limits respectively. Then the axis text would be 0,3,6,9 and put in the legend rpm x 1000.
Offset
Added to the input value before displaying as the needles value.
Display Options
0 % Limit
The value of the input when the needle is at the 0 % position
100 % Limit
The value of the input when the needle is at the 100 % position
Border
If clicked, the gauge will be drawn with a border.
Axis marks
If clicked, the axis will be marked with a graticule showing the range of the gauge.
Axis Text
If clicked, the axis will be marked with text showing the range of the gauge.
3D Border
For both RPM gauges, this setting draws a border around the object, suitable when the object has a light gray background.
Divisions
This specifies how many minor marks are inserted between the major markings on the axis scale, choose 1, 3 or 4.
Legend
Draws a text label within the gauge, can be used for range indication. i.e Deg C or rpm.
Append Units
For RPM Gauge 2, appends the units of the input tag to the value display at the bottom of the gauge.
DP SettingFor RPM Gauge 2, specifies the number of decimal points on the value display at the bottom of the gauge.
Marker 1
For RPM Gauge 1, this defines the colour interval along the graticule for the colour to change.
If marker 2 is not set, the graticule after Marker 1 will be drawn in Red up to the end of the gauge. If Marker 2 is set, the graticule after Marker 1 will be drawn in Orange up to the Marker 2 value. The values must be inside the range 0 % Limit to 100 % Limit and must be whole numbers.
Marker 2
For RPM Gauge 1, this defines the colour interval along the graticule for the colour to change.
If marker 2 is set, the graticule after Marker 2 will be drawn in Red up to the end of the gauge. The values must be inside the range 0 % Limit to 100 % Limit and must be whole numbers.
Note:
The gauge has no Opaque or Transparent setting, as they are always drawn as opaque.
See Also