| Recorder User Help |
| Display Options |
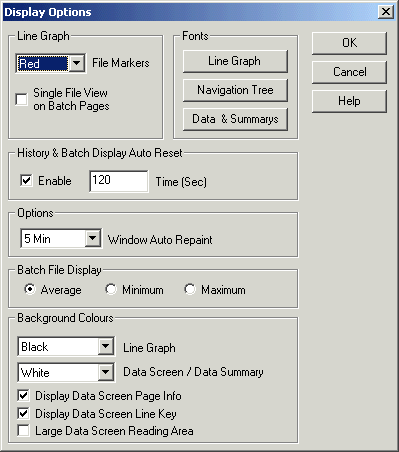
The Recorder Display Options dialog is used to set recorder display details.
It is accessed by clicking "Options" on the Recorders Display Menu..
Line Graph
The File Markers are vertical lines drawn on the graph to indicate a store file rollover or program start. Select either Off, Red, Green or Blue. A dotted line indicates a new store file has been started. A dashed line indicates a program restart. The Mouse Track can be used, to view the times either side of the line.
Single File View on Batch Pages
The Single file view causes the Line Graph (when the "Line" button is highlighted) to display data only from the current file. Normally used when the page is in the batch mode, so that when a new batch is started only the data from the currently running batch or last batch to be run is shown on the Line Graph. To see more data, use the History or Batch views.
History & Batch Display Auto Reset.
Enable & Time.
This setting controls the amount of time the History and Batch display are visible, until the recorder reverts back to the line graph. The default is 120 Secs. This is done so that if the display is left on History or Batch Display, the display will go back to Line, so the next person to use the software will see the online data and not be confused by previous data.
Options
Window Auto Repaint
This is the time the software will auto redraw the Line Graph. This is needed because some time combinations will cause the line graph to break up over time.
Batch File Display
Average, Minimum, Maximum.
This sets the sample method for data collection when a file is being viewed
in Batch Display. If the file needs to be compressed to fit in the screen, this
mode determines how it be sampled.
If Average is clicked, each point will be an average of several scans in the
file.
If Minimum is selected, each point will be the minimum value of several scans in
the file.
If Maximum is selected, each point will be the maximum value of several scans in
the file.
NB. This is not to be confused with getting a average, min or max values of
lines in the file.
Background Colours.
Choose from Black, Light Gray, Gray, White or Button Face (same colour as windows buttons). The default is Black.
Setting Custom Line Graph Colours.
Set the Line Graph Colour to Custom
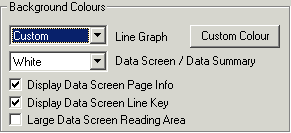
and Click Custom Colour to choose the required background colour.
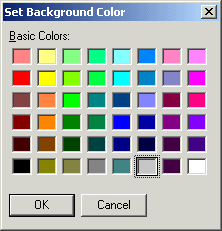
Select the colour and click OK. Click OK to close Display Options to update the Line Graph display.
Choose from White, Light Gray, Gray or Button Face (same colour as windows buttons). The default is White.
This displays the Pages summary info at bottom left of Data Screen. Default is on.
This displays the Data Screen Line Colour key at bottom right of Data Screen. Default is on.
Large Data Screen Reading Area
This setting allows the MicroScan to use a larger screen area on Data Screen, Alarm & Data Summary screens, to make the current value eaiser to read. The Data & Summaries button should then be used to adjust the font size.
Example with Large Data Screen Reading Area Off

Example with Large Data Screen Reading Area On

Example with Large Data Screen Reading Area On & Larger Font

This is with Arial, Size 12 font.
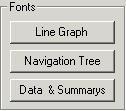
Fonts
Click the buttons to set the fonts for Line Graph, Navigation Tree, and Data & Summaries.
Font Selection

Choose a Font, style and size. Click OK.
Some line graph fonts will appear very small. A larger size may need to be
chosen.
Note Bold or Bold Italic cannot be selected.
For more information on setting up colours for recorder displays, see Recorder Screen Colours.