| Setup MicroScan |
| Line Setup: Connect to Outstation |
MicroScan Outstations / Shimaden Controllers
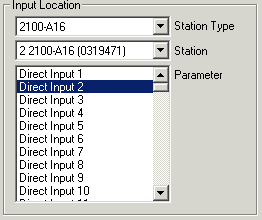
Example Input Location When Connecting to an Outstation

When a line is connected to an outstation, the Setup Program keeps track of which stations have been allocated and what their station types are. This information is used to build the Station Map display on the Right Hand Side of the Main Editing Window.
Connecting a Line to an Outstation.
Select the Station Number from the list of stations the station field. If the Station shows "(Free Station)" a station type must be selected to match the type of hardware installed. If the station has been accessed before it will show a station number and station type and when this station is selected, the station type will be changed to what the actual type of station is.
Station Types
| 2100-XX | Address programmed via software |
| IN2000-XX | Address set by DIP switch inside unit |
| Shimaden Controllers | Address set by front panel of controller. |
When accessing outstations, no two outstations can have the same address. The addresses of each IN2000-XX, Shimaden Controller must be set BEFORE attaching to the data loop.
Choose the Parameter to be connected to from the list of parameters. The list changes according to which station type is selected. Each location that can be accessed in the outstation will be shown in this list. When an item is selected, the line's data type i.e Analogue or Digital will be automatically set according to the type required to view this parameter.
When the lines setup has been entered by pressing the OK button, the Station Map on the right of the Main Editing Window will be changed to show the station being accessed and the location connected to this line will be show by a tick with a black rectangle around it.
See Also