MicroScan - Image Interface for Run
The MicroScan Image Interface when used for run is an excellent repository for user
input data or for data that has been created by one program and needs to be shared amongst
other MicroScan programs.
The Image Interface, when used for run, means that it will be running when MicroScan is
running and that it will be another interface in its own right, even though it does not
communicate with any external device but acts only as a place to Read and Write data.
An important point to note is that MicroScan requires each interface to have a unique
interface number. Therefore there are a number of important steps to make when setting up
the Image Interface for run.
- First from the MicroScan Setup Manager click on the large button "Admin
Tools".
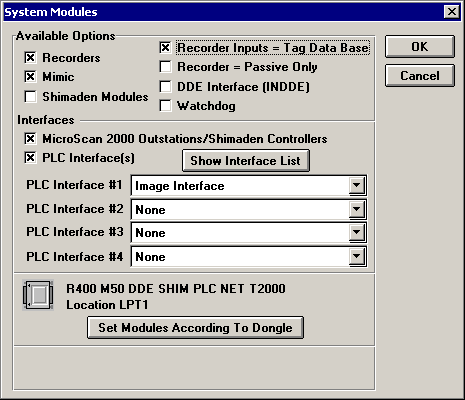
- Then select the "System Modules" button and the following form will appear.

- Check the "PLC Interface(s) and select "Image Interface" from the
"PLC Interface #1" list.
- Click "OK", then "Close" to return to the MicroScan Setup Manager
startup form.
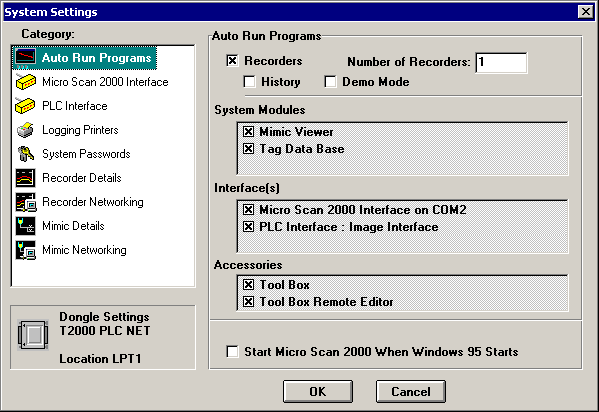
- Click on the "System Setup" button and the following form will appear.

- Under the "Interface(s)" heading, check the "PLC Interface - Image
Interface" as shown above.
- Click on the "OK" button when finished.
- Before starting MicroScan it is necessary to set the Image Interface Number to a unique
number (its default is 2). To set the Image Interface Number, from the MicroScan Tool Box
Setup program. Click on the "Program Options" button. Now click on the
"Set" button beside the "Image Interface Number" line and follow the
prompts remembering to select a unique number for the interface between 1 and 31. Refer to
Program Options.
- Start MicroScan.
 Back to Image
Interface Index
 Back
to Miscellaneous Index
 Back to
Contents


