
| Setup MicroScan |
| Relay Setup: Type and Address |
The Relay Setup dialog box is similar to the line and tag setup dialog boxes, except that it only has a Type & Address category.
The description is the relays name. This name is used to
identify the relay to the user in the other setup dialog boxes, such as the Recorder
Quick Setup, Alarm Output setup or Line
Setup, Alarm Outputs.
The Output Type is the data type of the output. this is not editable and always
set to Digital. The Station Type is the type of outstation ie 2100-A16,
IN2000-AI or PLC, the Station is the station number and the parameter is the
location to access within the outstation.
You can connect a relay to the 2 output relays of a 2100-A16, or to 3 open collector outputs of an IN2000-AI, or to the relays on an IN2000-DO unit. The 3 outputs on the IN2000-AI are called Digital Output 1, 2, 3 and are at the bottom of the IN2000-AI parameter list.
Connecting a Relay to an Outstation
Select the Station Number from the list of stations the station field. If the Station shows "(Free Station)" a station type must be selected to match the type of hardware installed. If the station has been accessed before it will show a station number and station type and when this station is selected, the station type will be changed to what the actual type of station is.
Use a parameter to identify the relay, such as Digital
Output 1, Digital Output 2.
When the relay's setup has been entered by pressing the OK button, the Station
Map on the right of the Main Editing Window will be changed to show the station
being accessed and the location connected to this relay will be show by a tick
with a black rectangle around it.
A relay can be assigned to a location on the outstation by dragging the connection point from the outstation map to the relay.
Connecting a Relay To a PLC.
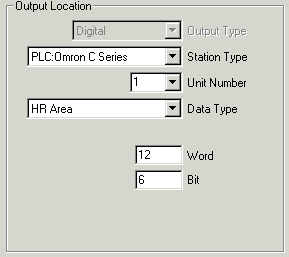
To connect a relay to a PLC, select the PLC from the Station Type list, and the address information will change to suit the type of PLC selected.
Choose the Unit Number, Data Type, Word and bit to locate the relay in the PLC.
When the OK button is pressed, a PLC map will be drawn in
the Main Editing Window with the selected location being highlighted.
A relay can be assigned to a location in the PLC by dragging the connection
point from the PLC map to the relay.
Relay Always ON - Designed for use with 2300-XX stations ONLY
This setting is provided for 2300 stations to make a comms
fail alarm on the station.
The relay is not actually used as an alarm relay, but microscan keeps the relay
turned on.
A setting is made in the 2300 station for Watchdog timer, thus if the MicroScan
fails to keep the comms working the station will turn the relay OFF. See 2300
Comms Fail for setup information and summary of operation.