MicroScan - Image Interface for Testing
The MicroScan Image Interface when used for testing is a powerful commissioning tool.
Say we have set up a system to run the MicroScan Interface and say this is an extensive system with Alarm Outputs and various critical actions.
Before such a system is put on line it is good to give it a "Bench Test".
To do this we will run the Image Interface in place of the MicroScan Interface. This will allow us to write whatever values we wish to the Image Interface for testing purposes.
- First from the MicroScan Setup Manager click on the large button "Admin Tools".
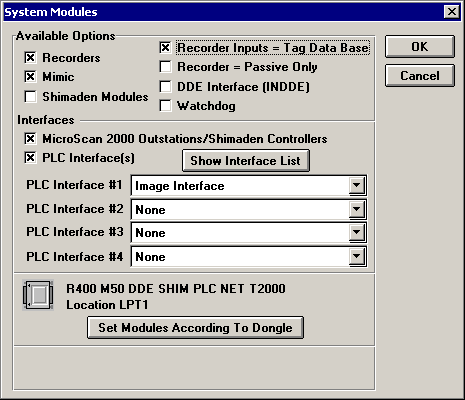
- Then select the "System Modules" button and the following form will appear.

- Check the "PLC Interface(s) and select "Image Interface" from the "PLC Interface #1" list.
- Click "OK", then "Close" to return to the MicroScan Setup Manager startup form.
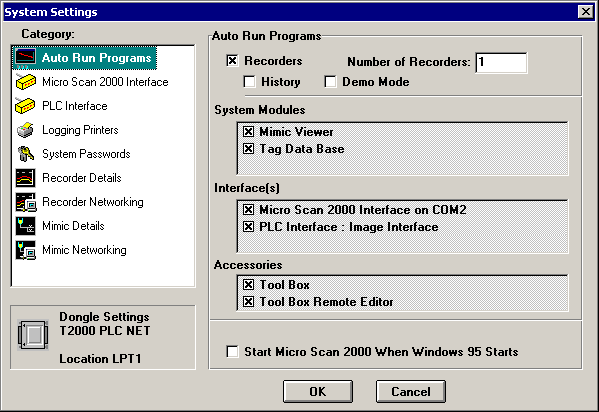
- Click on the "System Setup" button and the following form will appear.

- Under the "Interface(s)" heading, uncheck the "MicroScan 2000 Interface" and check the "PLC Interface - Image Interface" as shown above.
- Click on the "OK" button when finished.
- Before starting MicroScan it is necessary to set the Image Interface Number the same as the MicroScan 2000 Interface Number. The MicroScan 2000 Interface Number is always 0. To set the Image Interface Number to 0 start the MicroScan Tool Box Setup program. Click on the "Program Options" button. Now click on the "Set" button beside the "Image Interface Number" line and follow the prompts. Refer to Program Options.
- Start MicroScan.
Now that MicroScan is running with the Image Interface in a "Bench Test" mode, the next thing to do is to change some of the values so as to test the setup.
One way to do this is to use the MicroScan Workout.
 Back to Image Interface Index
 Back to Miscellaneous Index
 Back to Contents


