| Setup MicroScan |
| MicroScan Setup First Run |
If you have started Version 5 without the MicroScan DLP-D dongle attached, you will be then presented with the MicroScan V5 Licence Selection page, and after having chosen a selection will carry on with the settings as noted below.
Standard Install
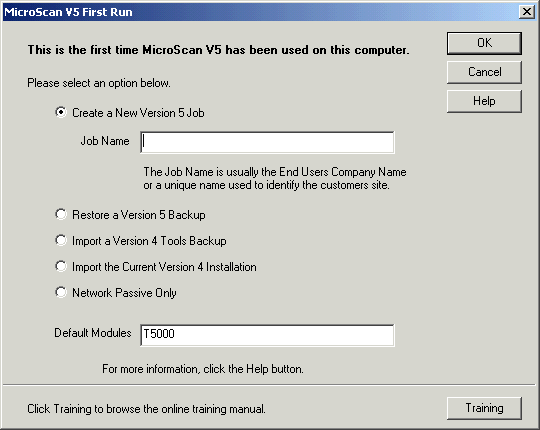
This startup screen is presented when the software is first run on a new computer.
Select a startup option from the MicroScan V5 First Run Startup screen.
|
|
If you wish to start with a fresh Version 5 Job, Select "Create a New Version 5 Job" (default setting), enter a Job Name and click OK.
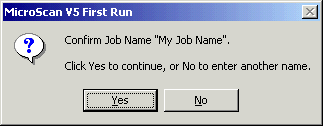
Press Yes to confirm the job name on the confirmation dialog. Note : Do not use any of the following
characters in the Job Name, as they are not valid:
|
|
|
To load a tools restore from a previous version 5 job, either from another
computer or supplied as setups by your MicroScan agent, select "Restore a
Version 5 Backup", and click OK.
|
|
|
To load a Version 4 tools backup, click "Import a Version 4 Tools
Backup", and click OK.
|
|
|
To import settings from the current Version 4 system installed on this pc,
select "Import the Current Version 4 Installation", and click OK. NOTE: This option will only be shown if MicroScan Version 4 software has been previously installed on this pc.
|
|
|
This option will be visible if you have been supplied
a CD with job setup included (The supplied CD must be in the CDROM drive before
starting Version 5 for the first time).
|
|
|
After these steps have been completed, if required the Select
Module Wizard will appear, which will guide you through steps for selecting
the operating modules and licensing for your program. If the software has predefined modules and is a Tag or PLC system, the Select Interface Wizard will be used next to select the Interfaces to be used on the job. |
Demo Install
For information on Demo Install, See Demo Install.
Note:
If your software has been supplied pre configured to load job settings, this window will not appear, and the settings for your job will be automatically loaded and setup for you.
See Also
MicroScan Setup First Run - Import
Existing V4 Install
MicroScan
Setup First Run - Import V4 Passive