| Station Setup |
| 2300-NET |
You use the 2300-NET to connect 2300-XX stations to the ethernet.
NOTE: To add 2300-NET stations, the Ethernet Mode must be turned on in MicroScan, either in Select Module Wizard or by using Setup Tools, MicroScan Interface settings to enable Ethernet Mode. When enabled, the Configure 2300-NET link will be visible in Remote Stations on the Setup Tools screen. See Enable 2300 Support.
For more information on 2300-NET to 2300-XX connections see 2300 Connect via 2300-NET.
The 2300-NET can be connected to a Network HUB or direct to a computer using a crossover cable.
IP Settings
When the unit is factory supplied, its IP address is set to 192.168.0.112.
NOTE: You must only add or setup one 2300-NET at a time, as they will all be
set to the same factory IP address (unless your provided has already set ip
addresses).
Using the MicroScan software, this address will need to be changed to a static
IP address to be used on your network.
For the initial setup, the factory address must be valid on your network, by changing your computers ip address to 192.168.0.113 or by having IT staff add 192.168.0.112 as a valid address in your servers DHCP setup.
Configuration of 2300-NET
To setup and test 2300-NET, click Configure 2300-NET on the Setup Tools screen.
For initial setup, changing the Factory IP address to a IP address on your network, see Configure 2300 Step 1
For testing and changing settings after Factory IP address has been changed, see Configure 2300 Step 2
Setting up 2300-NET
Setup of 2300-NET is done via a web interface using the Internet Explorer, see 2300-NET Setup via Web Interface
Setting Computer IP Address to use with 2300-NET
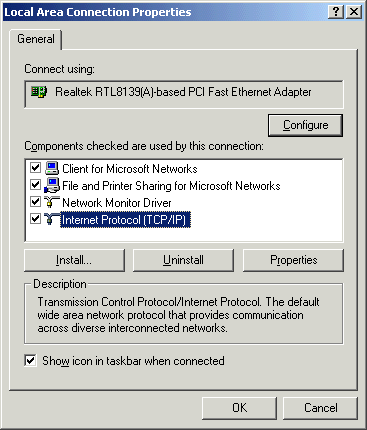
Start Control Panel
Double Click On Network Connections.
Right Click on your Local Area Connection, click Properties
Click On Internet Protocol and click Properties
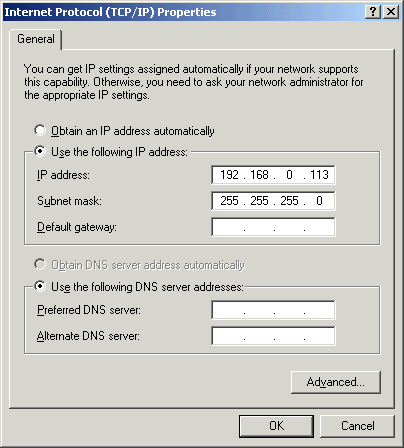
Enter the address 192.168.0.113 and subnet of 255.255.255.0, click OK, then click OK on the previous dialog.