| Recorder User Help |
| Alarm Scheduler |
The Recorder Alarm Scheduler is a Day of the week
scheduler that can enable and disable alarms in the recorder according to times
set. The scheduled times are set on a line by line basis, with copy and paste
facilities to copy settings from one line to another. A Schedule
Summary dialog box is provided which shows in graphical form the schedules
set.
On a daily basis alarms can be set to be monitored,
not monitored, or scheduled to be monitored within set times. When not monitored
the lines alarm is ignored. If the alarm is counting or already set when
entering a non monitored zone, the alarm will be cleared automatically. The
setting of zones overrides the alarm link enable, which will only take affect
during the period of monitoring.
Up to ten times can be entered per day, allowing 5
separate zones to be scheduled.
The times can be entered using am, pm or 24 hour
clock.
The Alarm Setup
and Alarm Enable dialog box shows if the
alarm is scheduled or continuous. The Data screen shows an scheduled line that
is not monitored as light gray.
By default, all alarms are continuously monitored
unless setup via the Scheduling dialog box.
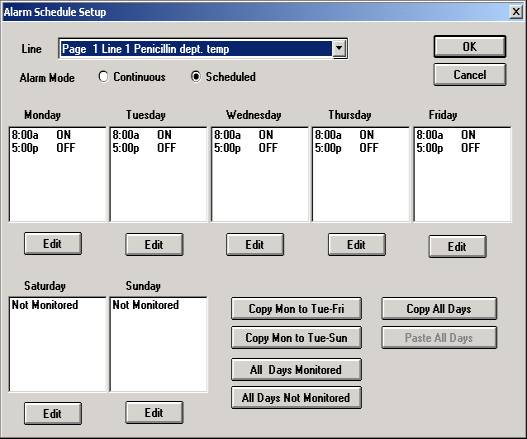
The Setup is completed using the Alarm Schedule
Setup dialog box. It is protected via level2 or User Level Access A.
To display Schedule Setup:
On the Recorders Alarm Menu, click Alarm Schedule Setup
Click Alarm Schedule on the Recorder Home page.
The following window will be displayed.
.
To select the line to be edited, select it with the
Line Combo Box. Selecting a new line automatically enters changes made to the
last line.
If the Line is not active, "Line Not
Active" will be displayed.
To enable the line for continuous 24 hour, 7 day of
week monitoring, "Continuous" is selected.
To enable the line for scheduled operation, "Scheduled" is clicked.
A day can be set to either, Always Monitored, Not
Monitored or Scheduled (displays list of times).
To edit the settings for a day, either click the edit button beneath the Day, or double click on the days information.
Copy
& Paste Settings
The copy and paste buttons can be used to duplicate
lines information.
Click "Copy Mon to Tue-Fri" to copy
Mondays settings to Tuesday to Friday.
Click "Copy Mon to Tue-Sun" to copy Mondays settings to Tuesday to
Sunday.
Click "All Days Monitored" to set all days to be scheduled on.
Click "All Days Not Monitored" to set all days to be scheduled off.
Click "Copy All Days" to copy the weeks
settings to the clipboard.
Then select another line and click "Paste All Days" to paste the data
from the clipboard to the selected line.
Schedule
Setup - Day Settings
Entering Days Schedule Information.
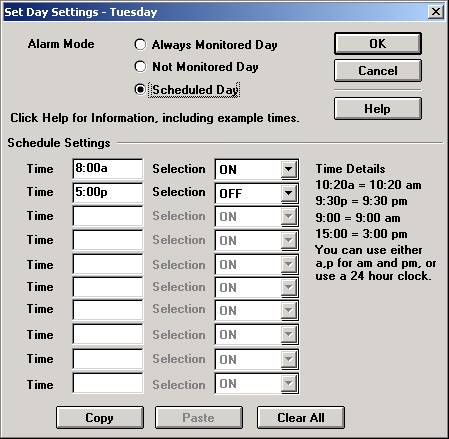
Select Always Monitored Day, if the alarm is to be
scheduled on.
Select Not Monitored Day, if the alarm is to be scheduled off.
Select Scheduled Day, if times are to be set to control the alarm scheduling.
For a Scheduled Day, the times are entered starting
from the start of day to end of day, then the Selection is made, as to whether
the alarm is be be scheduled ON or OFF at the entered time.
If set to ON, the alarm will be monitored from the
entered time to the next time or end of day if there are no further times.
If set to OFF, the alarm will be not be monitored from the entered time to the
next time or end of day if there are no further times.
The selections ON-OFF must alternate between each
entered time, giving a distinct zone of monitoring or not.
If the first time is entered as OFF, the alarm will
be monitoring from midnight to the entered time. (the midnight starting time for
monitoring is implied by setting OFF as the first entry)
Click Help to access Help and examples for schedule
time settings.
A blank time entry is the end of scheduling
information for the day.
An ON-OFF selection can only be made if the adjacent time information has been
entered.
Error checking performed on Day Settings.
If the times are not in sequence an error message
will appear.
If the selections do not alternate ON-OFF an error message will appear.
If the time is greater than 23:59 an error message will appear.
If no times are entered, an error message will appear.
Example
Day Settings
8:00a ON
5:00p OFF
The alarm is monitored from 8:00am to 5:00pm.
10:00a OFF
The alarm is monitored from midnight to 10:00am.
3:00p ON
The alarm is monitored from 3:00pm to midnight
8:00a ON
10:00a OFF
12:00p ON
2:00p OFF
4:00p ON
6:00p OFF
The alarm is monitored from 8:00am to 10:00am, from
12:00pm to 2:00pm and from 4:00pm to 6:00pm.
8:00a OFF
8:00p ON
The alarm is monitored from midnight to 8:00am,
then from 8:00pm to midnight.
8:00a OFF
2:00p ON
6:00p OFF
8:00p ON
The alarm is monitored from midnight to 8:00am,
then from 2:00pm to 6:00pm, then from 8:00pm to midnight.