| Recorder User Help |
| Alarm Setup |
This dialog box is used for setting up alarm levels etc. online within the recorder.
To display Alarm Setup:
Press “Alarm Setup” on the Alarm Status Screen
Select “Setup” from the Recorders Alarm Menu
On a Recorder Screen press “Ctrl + R”.
Click View Alarm Setup on the Recorder Home page.
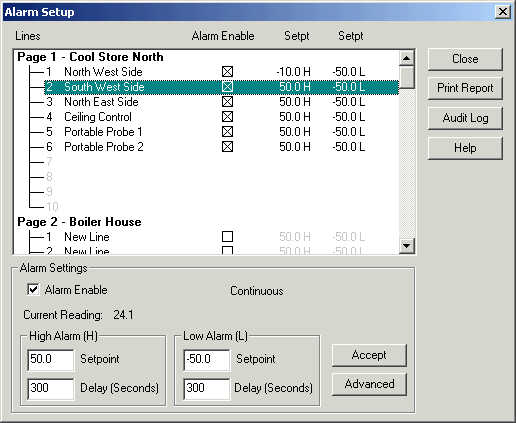
The following dialog is displayed.

Select the line from the list
of pages and lines combo box and the details will fill the controls in the
dialog box.
Make the changes required and press “Accept”. To access Advanced
parameters, press the Advanced button.
The setpoints show H or L
indicating if the setpoint is a high or low setpoint.
This is set by the Lines Alarm
Setup, Alarm Mode. It is not setup on this dialog as it is not common
operation that an operator will do.
Possible displays
| Alarm Mode | Setpoints |
| High & Low | H, L |
| High & High | H, H |
| Low & Low | L, L |
| High Only | H (Single setpoint) |
| Low Only | L (Single setpoint) |
The current reading of the
selected line is shown, along with its alarm schedule indication.
See Alarm
Schedule Setup.
When the dialog box is closed by pressing Exit, changes will be automatically saved to disk and an audit log of the changes (enable & setpoint values) will be saved.
Click “Audit Log” to view the audit history for the
lines. The Audit Log will show the audit changes for the recorder lines.
Click “Print Report” to print a report of the alarm setup.
Click Alarm Enable to enable the alarm on the line, and enter the high and low setpoints. Enter the time delays as required to prevent nuisance alarms, or to avoid alarms during defrost times. The maximum alarm delay is 32767 seconds, which is 9.1 hours.
This window is protected by Level 1 Access or by user level A or level B / level C.
Alarm Advanced Setup.
Click Advanced to Edit Advanced alarm options.
See Alarm
Advanced.
See Also
Alarm
Enable
Alarm
Schedule
Alarm
Setup
Alarm
Status
Alarm Settings
Alarm
Menu
Alarm Setup Summary
Alarm Monitor