| Setup MicroScan |
| Line Setup: Alarm Setup |
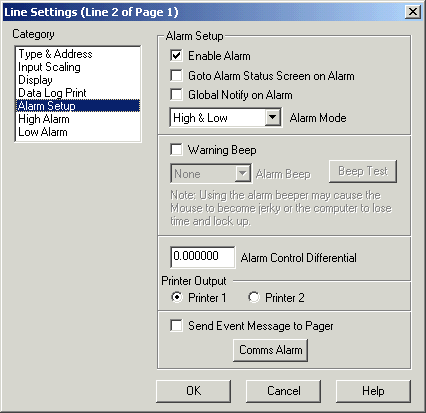
The Alarm Setup Category is used to setup the Alarm Settings for a
line.
For further information on Recorder Alarms, see Recorder
Alarm Operation.
Enable Alarm
Enables the alarm on the Line. All other alarm settings are ignored if this not on. If the Alarm is not enabled, the other two alarm categories "High Alarm" and "Low Alarm" will not be accessible. When the alarm is enabled, the setpoints are enabled according to the Alarm Mode setting (See Alarm Mode below).
Provides notification of the alarm by displaying a Dialog Box on top of all displayed Application Windows. The global notify dialog box shows the alarms that are currently active in the recorder. See Recorder Global Notify.
Goto Alarm Status Screen on Alarm
When an alarm occurs, the Recorders Alarm Status Screen is displayed.
Previously called "Show Alarm Status Dialog Box" in Version 4.
The Alarm Mode setting allows the selection of the alarms to be checked on this line. The possible settings are High & Low (Default), High & High, Low & Low, High Only, Low Only. As the setting is changed, the alarm categories on the left will change as follows
| Alarm | Categories |
| High & Low | High Alarm, Low Alarm (Default Setting) |
| High & High | High Alarm, High Alarm |
| Low & Low | Low Alarm, Low Alarm |
| High Only | High Alarm |
| Low Only | Low Alarm |
This setting is new to Version 5. The default setting of an imported Version 4 system is "High & Low", which is the same as how the Version 4 alarms where setup.
Warning Beep / Alarm Beep
The alarm beep is used when the lines in the Recorder have generated an alarm. The Windows Multimedia system is used to produce the beep. To cause a different beep, select the beep type (which refers to the standard Windows system sounds set up in the Control panel). The different beeps are only available if a sound card is installed in the PC. Press the "Test" button to check the sound of the beep. To enable the Warning Beep, click warning beep on. Please note the internal speaker on a PC is not very loud.
Warning: The Beeper may cause the computer to lockup and lose time. When the computer is rebooted, the time returns to normal. This has been found to be a bug in windows (especially windows 98/Me) and has been found to lock the computer up in as little as 24 hours beeping. If this happens, the computers warning beeper cannot be used. Turn off all alarm beeper settings, and in the Alarm Settings dialog box, turn "No Alarm Beep" ON. See Alarm Settings.
Alarm Control Differential
The alarm differential is used to determine when the alarm returns within its limits.
For a high alarm, the alarm is flagged when the input goes above the high setpoint (a) for the time specified by the High Alarm Delay. The alarm is within limits again when it returns below the high setpoint minus the alarm differential (b). For a low alarm, the alarm is flagged when the input goes below the low setpoint (c) for the time specified by the Low Alarm Delay. The alarm is within limits again when it returns above the low setpoint plus the alarm differential (d).
If the alarm differential is below 0.0005, the value of 0.5 is used.
This is the Printer that is to receive the Alarm Message, if the Alarm Setup Enable Print is Turned on. The logging printer is set on Graphics & Logging Printers.
Send Event Message To Pager
If this option is enabled, the lines alarm will cause a pager message to be sent to a Pager unit. This requires the installation of third party Pager software to pick up a file that the Recorder generates and then send it to the Pager Provider.
The pager must be enabled through the Pager Settings dialog
box for this to be visible.
See Pager Settings.
Exclude From Alarm Monitor
If this option is checked the line's alarms will not be monitored by the Alarm Monitor. Use for an unlatched control alarm that is being used as a controller and is not being used as an alarm.
These settings are made to cause an alarm when the recorder determines the comms has failed to the outstations.
Click Comms Alarm to make these settings.
See Comms
Alarms.
See Also
Type & Address
Input Scaling
Display
Data Log Print
Alarm Setup
High Alarm
Low Alarm
Digital Display
Digital Alarm
Math Settings
Tag Scaling
Counter Scaling