| Setup MicroScan |
| Line Setup: Display |
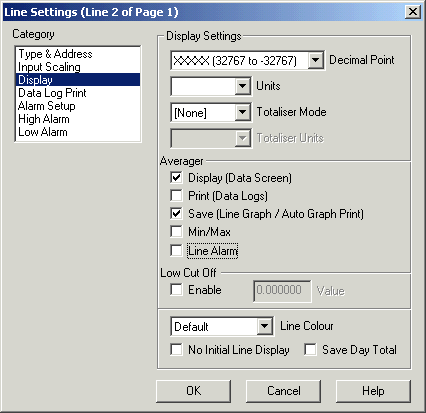
The Display Category is used to set the display settings for an analogue line.
This category applies to analogue values. It determines how the line will be displayed.
Decimal Point
This field controls the placement of the decimal point. It also controls the precision of the data shown on the graph display and the data that is stored if the file is a "High Speed File Format" File. Maximum and Minimum range figures are shown in the combo box. If the input goes out of range of the numbers specified for the number of decimal points chosen, it will display incorrect data on the Line graph displays in the recorder, however the data screen will show the correct values.
The decimal point setting should be chosen with care, so the input of the line does not go outside of the limits shown.
If a decimal point selection is picked that cannot display the currently selected input range for the line a Warning Dialog box will be shown when the Line Setup dialog box is closed. For Example, a range of -50 to +50 cannot be displayed with three decimal points, as the maximum range for three decimal points is -32.767 to 32.767.
Units
This is a text field that identifies the units of the line i.e "Deg C", "Kpa", "Amps" etc. This appears on the Data Screen.
Totaliser Mode
This selection specifies the speed of integration for the totaliser input. The available selections are Hour, Minute or Second. The rate must be chosen to match the rate of the input transducer to produce the correct total. If the input is at 100, and one hour is chosen, it takes one hour to add 100 to the current total value. When a digital input is being totalised for hours run indication, the Totaliser mode should be set to Seconds.
The totaliser information is saved into the Recorder's store files and can be viewed using the Recorders View Totals dialog box.
Totaliser Units
This is a text field that identifies the units of the totalised value i.e "Kg", "KWh", "Litres" etc. This appears on the Data Screen next to the Totalised values.
The Averager options are used to apply an averager to the
lines value. The rate of the averager is set in the Recording Options of the
Page Setup dialog box. These settings will not be visible unless the Page has
its averager turned on.
See Page
Averager Settings.
Display (Data Screen)
Click this on to displays the lines average value on the Data Screen
Print (Data Logs)
Click this on to print the lines average value on the Data Log print out.
Save (Line Graph / Auto Graph Print)
Click this option on to save the lines average value into the line graph.
Min/Max
Click this checkbox to make the lines minimum and maximum values to be calculated from the Average value rather than the instantaneous value.
Click this option to make the lines alarm use the Average value for checking against the alarm setpoints. On startup, the lines alarm will not be checked until the period of the averager has elapsed. i.e if the page has a 2 hour averager on it, the alarms will not be checked until a full sample of 2 hours has been taken.
This option is new for Version 5. Its action was previously
available under Version 4, with the setting "Ave Min Max Alarm Mode"
in the Recorders Customisation dialog box. Also the line needed its Averager
Min/Max checkbox turned on. It was set on a Recorder by Recorder basis, it is
now set on a line by line basis.
Low Cut Off
The Low Cut Off resets the lines value to zero if it falls below the preset value. Click Enable to enable the low cut off and enter the desired cut off point into the Value edit box. This is used to hide noise on the input signal. When the signal goes below a certain value, we do not care about its value, so a value of 0 is used.
The Line Colour control determines the colour of the Line of the Line Graph display. A setting of Default uses the default colour for this line. The Line's colour is shown next to the line's display in the Pages and Lines editing window.
When this is turned on it initially disables the appearance of the line on the Line Graph. This is used where the lines data is needed or may be needed on the Data screen, but its presence is not required on the Line Graph. If this option is clicked on, the line can still be made visible within the Recorder by clicking it on within the Recorders Line Details dialog box. See Line Details.
Save Day Total
This option allows the day total of the line to be saved to
the line graph instead of the current lines value. The Line Details will show
the total value being saved, but the Data Screen will show the input data for
the line.
Care should be taken with the lines decimal point selection to make sure the
total value fits inside the range specified for the decimal point selection
chosen.
This option is new for Version 5.
See Also
Type & Address
Input Scaling
Display
Data Log Print
Alarm Setup
High Alarm
Low Alarm
Digital Display
Digital Alarm
Math Settings
Tag Scaling
Counter Scaling