| Recorder User Help |
| Alarm Enable |
The Alarm Enable dialog box is used to quickly turn on or off the alarms for lines within the Recorder.
To display Alarm Enable:
Press “Alarm Enable” on the Alarm Status Screen
Select “Enable” from the Recorders Alarm Menu
On a Recorder Screen press “Ctrl + Q”
Click Enable Alarms on the Recorder Home page.
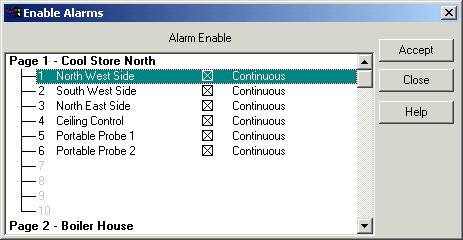
The following dialog box appears.

The dialog box consists of a list containing the line’s labels and a checkbox for each line which is used for turning the alarm on or off. If the checkbox is crossed, the alarm is enabled, if the checkbox is empty the alarm is disabled.
Too see more pages & lines use the scroll bar to scroll the pages into view. The dialog can be resized using the border at the bottom of the window.
To enable or disable the alarm, click the checkbox of the line in the listbox. As it is selected, the line’s checkbox will toggle.
Press “Accept” to turn the load the changes into the Recorder, or press “Cancel” to abandon the changes.
If Accept is pressed and the alarm enables are different from the ones currently used by the Recorder, the data will be automatically saved to disk and the changes made will be recorded in the audit log.
Lines that are scheduled will show "Scheduled", lines not scheduled i.e Continuously Monitored show "Continuous". See Alarm Schedule Setup.
This window is protected by level1 access or user level A/ level C access.
See Also
Alarm Enable
Alarm Schedule
Alarm Setup
Alarm Status
Alarm Settings
Alarm Menu
Alarm Monitor
| Note: Changes from Version 4. The software has changed slightly from Version 4. It was possible to change the alarm state of a line by clicking anywhere on the line to toggle it, and it would also change if the lines selection was changed when using the cursor keys to move up and down in the list box. In Version 5 this has been changed so that only by clicking on the checkbox area can the alarm state of a line be changed. |